MySQL and LibreOffice
Most of the time I use the great Sequel Pro app from http://sequelpro.com to edit SQL (it’s really fast and light) but occasionally I need to write complex SQL queries. It can sometimes be easier for me to visualise the SQL relationships using a GUI editor like LibreOffice or OpenOffice. I tend to use LibreOffice, not because it’s better than other programs but because I can’t be bothered learning something new. (My laziness to learn something new even extends to putting up with LibreOffice quirks like relationship connections being off slightly in full screen mode, dragging a table off the bottom of the design view panel resulting in it scrolling like a bat out of hell, unintuitive saving procedures and the rainbow beachball of death if you create a dumb SQL query …. sounds like a lot but it really only results in lost data every 5 mins 🙂

The following instructions describe the steps to set up LibreOffice for accessing MySQL in MAMP on Macintosh but they could easily be modified for any MySQL install.
Initial Setup
Make sure you have Java installed, LibreOffice installed and MAMP running. You will also need to know the settings for connecting to your database (Database name, server, MySQL port), if you are using a standard MAMP install you can check the MySQL username, password (usually root and root) and the MYSQL port number from the default MAMP web page. The easiest way to find this is to click “Open Start page” on the MAMP control panel. The password, username and port should be shown on the opened webpage as below:


To connect to MySQL in LibreOffice or OpenOffice you will need a database connection method like MySQL JDBC. The drivers for this can be downloaded for free at the MySQL web site. Download the Connector/J from the mysql web site: https://dev.mysql.com/downloads/connector/j/
The resulting “.jar” file, once downloaded needs to be stored somewhere on your hard drive (eg I copied mine to the library folder: ~Library->Java->Extensions). See the location I used below:

Configure LibreOffice to use the Connector/J driver
We now have all the pieces in place to connect to our MAMP MySQL database. (Make sure MAMP is running at this point and you have a green light next to MySQL Server).
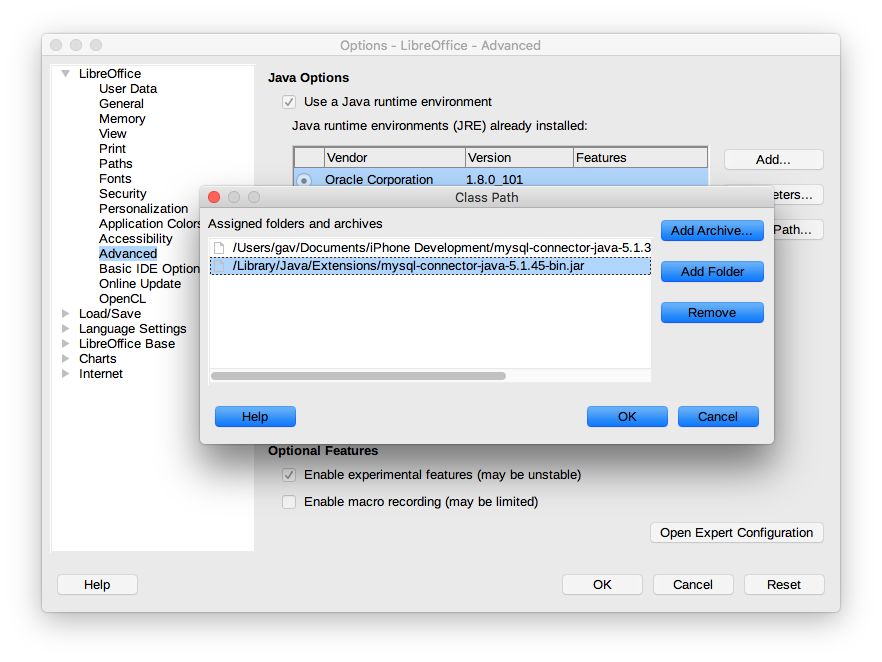
Load LibreOffice and open the Preferences menu. We first need to tell LibreOffice where to find the MySQL connector “.jar” file we just downloaded. Find the Advanced panel, make sure “Use a Java runtime environment” is ticked and then click on “Class Path“.

In the Class Path dialog box click on “Add Archive“, then select the mysql-connector-java-xxxxx-bin.jar file that you downloaded previously. After you click okay it should now show up in the Class Path assigned archives list like below:

Opening a New Database in LibreOffice
We can now go ahead and create a new Database using the File->New->Database menu. You are presented with a Database Wizard, follow the steps below.
Step 1: Choose to connect to an existing database using MySQL

Step 2: Select “Connect using JDBC (Java Database Connectivity)” and then click Next.

Step 3: This step involves inputting the MySQL database settings; the database name you want to connect to (you can see below that I connected to my Moodle database called moodleMYSQL), the server address (MAMP will usually use localhost) and the port number (this will vary depending on the platform. You can see my MySQL port number was 8889 but on Windows machines it will sometimes be the default MySQL port of 3306).

You can test your driver by clicking the “Test Class” button but note that this is not testing if your connection settings are correct but just that the driver is installed correctly. Move to the next step of the wizard.
Step 5: Enter the database user name (default for MAMP is root) and click “Test Connection“. You will be asked for the password, which by default for MAMP is also root. If everything works fine then you are done with creating your database connection and you can click Finish.


Final Steps: To check that you have correctly connected to the MySQL database check out the Tables tab. If, for example, you have connected to a Moodle database you should see all the tables displayed here (see right) but if you have connected to your own blank database you are now ready to create your tables, queries, forms and reports.

