
Is it just me or is it really hard to find simple programming tutorials on Moodle? Especially for people like me who can barely string two lines of code together to save their life. I don’t want to read the whole developer API wiki for fun. Yes, I know it is a good idea, I know it is important to understand the style guide if you don’t want to get a slap over the wrist from the Moodle admins when you submit your amazing new plugin ……. but sometimes I just want to play with something and learn by experimentation, that’s when I want someone to hold my hand step-by-step and maybe if I want I’ll read the important stuff later.
Hence this post! I thought it would be easy to use the Moodle form element “editor” in a block I was working on. Alas, while adding it was easy, including files/images correctly proved to be a challenge. Google wasn’t much help either, every search resulted in links to pages that assumed I knew what I was doing. Everything said just add this and then do that but it didn’t include a why or a where, there seemed to be some Moodle Voodoo that I was missing.
That said, a Disclaimer first: I know “sedikit” about Moodle programming or the API. I just play and see what happens, so follow this tutorial at your own risk ….. and please don’t try it on your live Moodle Production machine servicing 3 million medical students who need access to life saving information for displaced sudanese refugees. Also, if you are a seasoned Moodle programmer please let me know of any fixes so I can improve the code.
Resources: There are a few pages that I found helpful and if you know Moodle coding already then look here first.
- https://docs.moodle.org/dev/Using_the_File_API_in_Moodle_forms#editor
- https://docs.moodle.org/dev/lib/formslib.php_Form_Definition#editor
- mod_glossary edit.php and edit_form.php file
Background:
If you are here then you probably know how to create a Moodle form already. If not then this is not the place to start. Have a look here first to get up to speed on creating a basic Moodle form.
Why a block?
Because I haven’t tried to create a Moodle mod …… sorry.
Basic structure
There are a few things that you need to have created already for this to work. Firstly, hopefully you have Moodle set up I am going to also assume that you have a dummy block plugin created and a corresponding database table.
For example for this tutorial I have a two files, one called editinfo.php and editinfo_form.php. The GUI code will be in our editinfo_form.php file and the logic of saving in editinfo.php.
I have a database table called mdl_block_reportadmin and a number fields for storing different information. The way I want the two linked is shown here:

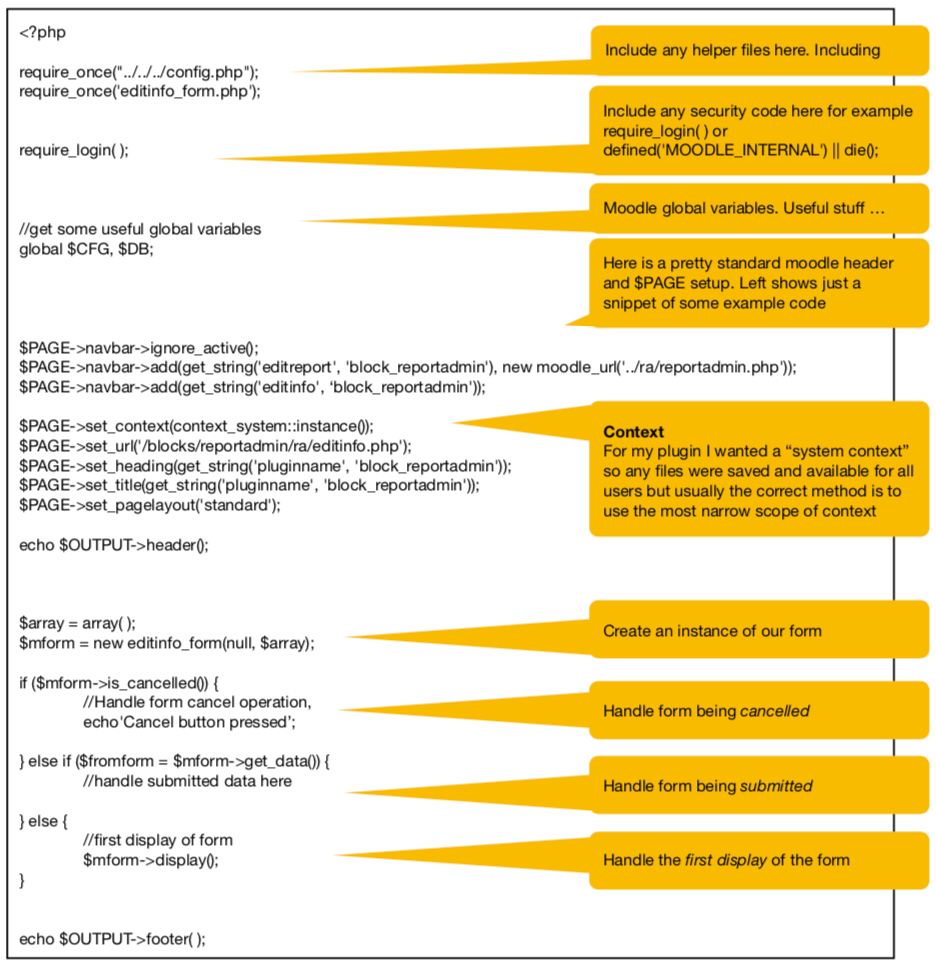
The basic structure of the code that is needed to achieve this is shown in the example Source code for editinfo.php:
Example Source code for the editinfo_form.php:

The template code above shows a really simple form with one HTML element and another text box. It doesn’t include any code to save our data to a database. I know of two different methods for saving data in a database (there may be more). The first involves setting default values of each field manually, the other uses the set_data( ) function to synchronise GUI elements with database fields. An example of both is included below.
Manually setting form element defaults
The first method for form population and submission involves setting default values manually using the following steps:
- Load the data into an object using the Moodle get_record functions.
- Populate the HTML form with any current data using the setDefault( ) Moodle function.
- On submission use the form data and create a new standard class (stdClass( )) containing the database record to save.
- Save the data using update_record(), or insert_record() as appropriate.
What does that process look like using the editinfo and _form code above:
Imagine we have a database table called block_reportadmin and we want to create a Moodle form that loads and saved the report_title field.
Step 1: In our second file editinfo_form.php we can add the following line to load the data, in this case record id 17 from our reportadmin table. [Though we could put this code into our editinfo.php file and then pass it to our editinfo_form.php using the $this- >_customdata functions. See method two for an example of this in action]

Step 2: To populate the HTML form elements with any current data we use the setDefault( ) Moodle function as shown below. This is again in the editinfo_form.php file.

Step 3 & 4: On submission the form data stored in the $mform object is retrieved by the editinfo.php file using the ->get_data( ) function. From this I usually create a new object containing the data I need to update/insert into the database. This is done in the editinfo.php file as shown below.

The second method for form population and submission involves the following steps:
- Load the data into an object (eg called $period) using of the Moodle get_record functions (in the example shown we will load the data in the editinfo.php file and then pass it to our editinfo_form object but this is not essential) .
- Create a Moodle form, making sure all the elements are named exactly the same as their matching database field names.
- Add the command $this->set_data($period) to the end of the Moodle form. This will ensure all database fields with matching form element names are populated automatically with their matching data.
- On submission the form data will automatically match the database names for easy saving using the update_record() or insert_record() methods.
Step1: In editing.php we will load our data and then pass it to our form.

Step 2 & 3: We will retrieve the passed $period data and create a Moodle form with matching element and database field names.

Step 4: To save this data I tend to use the same method as before, create a new object, copy the data from the form into it and then save. Hence the code is almost the same as the previous method.

Moodle form editor code
Hopefully all of the previous information works and makes sense and we can now look at what needs to be done to create an ‘editor’ form element that includes the ability to save images.
By default when you include an editor element in your form any images you insert using it are saved to the form draft area. Therefore there is some additional Moodle Voodoo that needs be done to make these files move to permanent storage and links saved in the database correctly. From the Moodle documentation we can see that we first need to:
1. name database fields: textfield, textfieldformat (and textfieldtrust if required)
2. create options array. note that context is the best, most local context you have available.
$textfieldoptions = array(‘trusttext’=>true, ‘subdirs’=>true, ‘maxfiles’=>$maxfiles, ‘maxbytes’=>$maxbytes, ‘context’=>$context);
3. add editor textfield_editor to moodle form, pass options through custom data in form constructor, set $data->id to null if data not exist yet
$mform->addElement(‘editor’, ‘textfield_editor’, get_string(‘fieldname’, ‘somemodule’), null, $textfieldoptions);
4. prepare data
$data = file_prepare_standard_editor($data, ‘textfield’, $textfieldoptions, $context, ‘mod_somemodule’, ‘somearea’, $data->id);
5. get submitted data and after inserting/updating of data
$data = file_postupdate_standard_editor($data, ‘textfield’, $textfieldoptions, $context, ‘mod_somemodule’, ‘somearea’, $data->id);
How this looks in the sample code we have written earlier is shown as follows. We will use the second method of submitting and updating forms for the code that follows.
NOTE: Let’s make one change to our code first. At the moment we are always looking at record id 17. Usually it makes more sense for this to be dynamically updated, so if a user wants to edit record 16 this will be sent to the form. EG if the user is editing id 16 then the URL would be “http:// ……/moodle/block/reportadmin/editinfo.php?id=16”. In the code below we will store this ID in a variable called $rid (short for report ID).
 Although the form element will be called ‘cover_editor’ in our addElement function the field in the database needs to be called ‘cover’. There should also be an additional field in the database called ‘coverformat’. If either of these database fields are not present the following won’t work.

We will start with the editinfo_form.php file as it contains the least amount of changes. The main addition is of the editor element.

Most of the major changes happen in the editinfo.php form below. Make the following changes using our “second method code” as the template:

Preparing editor content using file_prepare_standard_editor( )
In the example above we note the items that get passed into the file_prepare_standard_editor( ) function.
$period = file_prepare_standard_editor($period, ‘cover’, $attributes, $context, ‘block_reportadmin’, ‘report_html’, $period->id);
- $period : the data record that contains the editor content.
- ‘cover’ : this is the field name. ie also the element name without the “_editor” suffix
- $attributes : sets some minimum properties for file saving. See the documentation for more info.
- $context : lets the editor know the saving context (system, block, course etc)
- ‘block_reportadmin’ the name of your plugin or mod.
- ‘report_html’ : this is the name of file area and does not need to be the same name as the database field.
- $period->id – this is the primary id from our database record for this element.
What this function does is look at the $period record and analyse the ‘cover’ field. If there is already data in the field it will analyse it and look for any linked files. It will then copy these to the draft area and rewrite the URL so they display correctly. If you were to look in our database you would see that the ‘cover’ field shows linked images in an encoded form of @@PLUGINFILE@@/someImage.png. Without the file_prepare_standard_editor( ) function our editor keeps this image name and therefore shows a missing image.

After this function is run the URL looks more like “../draftfile.php/160/user/draft..” and points to the correct newly copied draft image file. As was mentioned before if we call the form element ‘cover_editor’ we must have a database field called ‘cover’ and ‘coverformat’. See the Moodle source code in lib/filelib.php for more information.
Saving editor content using file_postupdate_standard_editor( )
The previous code was only responsible for viewing and setting up the editor for usage. The next piece of the puzzle deals with what to do with editor content on form submission, saving it into our database and moving any images to the permanent storage area.
The file_postupdate_standard_editor( ) function is the companion function to file_prepare_standard_editor( ). It is responsible for moving draft files to the destination directory and encoding the URL’s into the @@PLUGINFILE@@ format. The parameters provided should be identical to the prepare function to ensure that data is saved and read from the same folders and encoded identically.
Since saving occurs in the editinfo.php file we make the following changes:

That should be it, easy isn’t it !! …. so why did it take me two days to work it out???? Anyway, since Moodle saves files to drafts you won’t be able to really confirm if it is working without logging out and trying to view the result using someone else’s login. Happy moodling.