
Stage 2: Loading and moving our landscape
 The next stage of our game is more complex, it loads the landscape and scrolls it down the screen. To do this we will create three functions, the first two will be used by many of our game objects and the last just for the landscape.
The three functions are:
- An updateLoading() This makes sure all resources are loaded before starting the games run loop.
- A run loop function called updateGame(). This function is responsible for carrying out the bulk of our game logic. It will try to update every 16.67 milliseconds (60 frames per second).
- The third function is our landscape() function, responsible for all data and methods/functions associated with moving our islands.

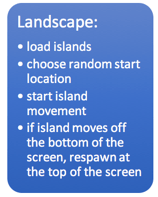
Above: Diagram of our updateGame( ) run loop
Before we create these functions we need to create 5 new global variables (lines 5 to 10) at the start of our JavaScript file, add them after the “var canvasHeight = 900;” like below:
var gameCanvas;
var ctx;
var canvasWidth = 900;
var canvasHeight = 800;
var landscape1;
var landscape2;
var landscape3;
var numResources = 3;
var loadProgress = 0;
var requestID;
Next, create our two new updateLoading() and updateGame() functions. Put these at the end of our “1945.js” file (make sure they are after the last “}” of our window.onload() function.
function loadingUpdate() {
  if (loadProgress == numResources) {
    requestID = requestAnimationFrame(updateGame);
  }
}

function updateGame() {
  requestID = requestAnimationFrame(updateGame);
  ctx.clearRect(0, 0, canvasWidth, canvasHeight);
  landscape1.update();
  landscape2.update();
  landscape3.update();
}
Our landscape function will set the initial location of the islands, be responsible for updating their locations and checking to see when they have moved off the bottom of the screen. If our island moves off the screen it is moved back to the top of the screen so it can scroll past again.
function landscape(file, x, y, width, height, wait) {
  this.wait = wait;
  this.timeout = false;
  this.image = new Image();

  this.image.onload = function () {
    loadProgress = loadProgress + 1;
    loadingUpdate();
  };

  this.image.src = "images/" + file;
  this.x = x;
  this.y = y;
  this.yspeed = 0.8;
  this.xspeed = 0;
  if (width > 0 && height > 0) {
    this.width = width;
    this.height = height;
  }

  this.update = function () {
    this.y = this.y + this.yspeed;
    this.x = this.x + this.xspeed;
    if ((this.y > canvasHeight) && (!this.timeout)) {
      var self = this;
      setTimeout(function () {
        self.y = -100 - self.height;
        self.x =30+Math.random()*(canvasWidth-self.width);
        self.timeout = false;
      }, self.wait);
      this.timeout = true;
    } else {
      ctx.drawImage(this.image,this.x,this.y,this.width,this.height);
    }
  };
}
To create an island we have some initial conditions that we need to pass into the landscape function. From the above code you can see that the function needs:

window.onload = function () {
gameCanvas = document.getElementById("gameCanvas");
gameCanvas.width = canvasWidth;
gameCanvas.height = canvasHeight;
ctx = gameCanvas.getContext("2d");
landscape1= new landscape("island1.gif", Math.random()*canvasWidth, -50, 200, 200, 0);
landscape2= new landscape("island2.gif", Math.random()*canvasWidth, -300, 200, 200, 800);
landscape3= new landscape("island3.gif", Math.random()*canvasWidth, -500, 200, 200, 1100);
};
You will notice above that we pass our landscape() a random X coordinate. This means that our island can appear anywhere from 0 to 900 pixels (canvasWidth) horizontally. See the callout below for how random numbers work on computers generally and in JavaScript.
If you are using your own custom graphics change the file name from “island1.gif” to something else and if you are using a different canvas size then you might want to change the island widths to something other than 200px wide by 200px high.
When you run your game and you should see the three islands scrolling down the page. Wait to make sure they reappear at the top of the screen after they have disappeared off the bottom.

The first time I played with JavaScript animation and run loops I used the setInterval() function of JavaScript. This seemed to work fine, I could run the line gameInterval = setInterval(updateGame, 16); and it would attempt to run the updateGame function every 16 milliseconds (roughly 60 frames a second). To end the run loop the line clearInterval(gameInterval); would stop it.Later I discovered there was a built in function that manage JavaScript animation much more efficiently. It will try to execute 60 frames a second (every 16.6666 milliseconds =1000/60) and also manages other aspects such as browser optimisations and background updating. For example, it won’t animate when the browser tab is not showing which is better for laptop battery life and CPU load.
To use it we need to:
1. call our run loop function initially with the line requestID = requestAnimationFrame(updateGame)
2. then place the same line inside our run loop so that it will call the next frame 16.7 milliseconds later. See our updateGame function for an example of this.
Note: the requestID variable is optional and is only useful if we want to manipulate our animation frame later (for example our endGame() function can end the run loop using this variable by calling cancelAnimationFrame(requestID).
Move on to stage 3 –>
Jump to: [Vertical Shooter Post: 1 | 2 | 3 | 4 | 5 | 6 | 7 | 8 | 9 | 10 ]